Friday, October 4, 2013

HP Envy 17 CTO j000 additional hard drive kit review newmodeUS.com

I recently purchased HP's Envy 17t Quad CTO (custom to order) j000 (Haswell) model. 

During the purchase process you have a choice of a primary 1TB HDD and a secondary 32GB SSD (solid state drive) performance booster. There was no option to use a single SSD - I suspect this is a way for HP's suppliers to reduce inventory of HDDs and SSD caching devices since they are going the way of the dinosaur. The 32GB SSD is some sort of caching device that works with the Intel chipset and or Windows 8 and stores the frequently accessed files to reduce Windows' start-up times etc. It is affordable, but there's just no substitute for having your primary boot device with all your programs and games on an SSD. The performance gain cannot be emphasized enough.  Most computer users are migrating to SSD drives these days since the cost per gigabyte has decreased, even with the higher price compared to a regular mechanical HDD for the massive improvements in speed.  

I declined the SSD booster drive and just went with the single 1TB HDD but being aware of the wild increase in performance an SSD offers, I ordered the Samsung 840 EVO 250GB ($190 at time of purchase) (now updated to Samsung 850 Pro) and sat the 1TB aside. My boot time went from nearly 35 seconds to 12. The factory 1TB HDD has a max transfer rate of about 70MB. 

I do a little video editing and casually play games so I knew that 250GB wouldn't suffice, but the 500GB model was out of my price range. I then went on a search for the hard drive caddy and SATA cable to connect two hard drives so I could use the 1TB as a storage location. This wasn't an easy feat and required some patience.

 Because the Envy 17 j000 model is new (introduced in Q3 2013) there is a lack of documentation of part catalogs. It would seem I could just buy the cable that would have come with the unit if I had got it with the secondary booster SSD but after searching through the entire HP PartSurfer list I found nothing. Many of the items had vague descriptions and my model number actually wasn't even in the catalog so I was searching by Envy 17 - which is a completely different model from the j000 variant. Some of the other weirdness I saw in the catalog was a plain ol' power cable for $30+!

After Googling around I found a company, newmodeUS, that specialized in laptop drive caddies and cables. They had one for the older Envy 17, but not the j000 model (** is in stock now**). I contacted them last month and production for the new HP series was on schedule for an early October 2013 release. I received prompt answers and they even wrote me when the product was ready to ship. The kit was a bit pricey at $29.85 (+ tax and shipping) considering that it's a wire and 2 rubber strips but there aren't really any other choices. I will acknowledge that the connector to the board side is very specialized with a very small T shaped press down clip and small wires, so there's some R&D that went into this for the cost. It is designed properly for the most part with the correct length to reach the hard drive and not intrude. I'm sure it's based on the HP OEM wire for the 32GB booster SSD. Because of the quick responses I got a good feeling from newmodeUS.

My kit arrived in a nice box. Included were the two rubber sides for the drive, and the SATA cable. The rubber strips actually don't fit properly so I had to cut about a 1/16th of an inch off the ends. See the video for more details.


Installation - 

Begin by powering off the laptop. Flip it over and remove the battery by sliding the release lever and lifting it out. Take a small properly sized phillips screwdriver and loosen the screw. Note that it does not come out completely, it's designed that way so it doesn't get lost. Pull up from the edge near the screw and go around the cover and use some force to lift it off. You will hear some snaps- don't worry. 


At the time of this writing the rubber caddy strips are too long to fit in the bay at least with the Samsung SSD. I took a X-Acto knife and trimmed off 1/8 to 1/16th of an inch from the end. I've reported this to newmodeUS.


Connect the motherboard side of the cable. Please be careful and move slowly. The connector must be inserted precisely. The first time I thought I had it in it didn't work. Use some pressure to push it so the T shape plastic goes behind the matching key. Reference the #1 connector if needed. Flip the lock lid down and reverse the disassemble process.  


The Envy UEFI BIOS has no option to disable/enable the SATA ports. They are always powered on. It also does not see the hard drives as separate boot devices in the boot selection area of the BIOS, however the F9 boot menu will see 2 if there is an OS on both. If it's a blank drive as an addition there should be no issue besides initializing and formatting it in Windows. 

Thanks to newmodeUS for a product that works great. I just hope they can make a slight change in production for the caddy strips.

Here is a short video I took during the process. 


Thursday, October 3, 2013

Galaxy Note 3 transition animation bug

Please note this appears to have been fixed in the 4.4 Kitkat update released by T-Mobile today, 3/5/2014. 


There's a bug in the developer options. Is that ironic? Turning off the transition animation only lasts an unknown amount of time (haven't tried to figure it out yet) before it reverts back to 1x. The other animation settings are not affected. 

Here are two threads about it
http://forum.xda-developers.com/showthread.php?t=2466397

http://forums.androidcentral.com/samsung-galaxy-note-3/319728-help-note-3-developer-options-bug-transition-animation-scale.html


Monday, August 26, 2013

HP Envy 17t j000 quad core laptop (Q3 3013) review and notes

For the first time in my 13+ years of computing, I purchased a new laptop. All my previous ones had been end of life company laptops for little cost or hand me downs. Often I would then hand those down to family as I upgraded to the newer one I acquired. My last laptop was a Latitude D630 which I was using casually for capturing audio/video for my drumming practice. The problem was that a Core2Duo just didn't have the juice to record 720p footage without dropped frames. Of course real time CPU compression wasn't possible so there was a significant time allotted to rendering post capture.  Not knowing at the time that a C2D wasn't strong enough and not having the exposure to newer processors like the Core series I thought I could get away with upgrading the CPU and adding a faster 7200RPM drive. Yes, that's right- I actually purchased a used mobile CPU and took the laptop apart to get another 200mhz or something silly. But I like doing that stuff. Then there was the $50 for the hard drive...which made my technical brain happy for the accomplishment but had little impact on the video editing.

Earlier this year my Grandparent's laptop crashed (one I handed down from years ago) and they were out of commission for a few weeks. Realizing how much they relied on it got them even thinking about buying a new one which was a big step for the non-computer generation. After increasing complaints about not being able to check e-mail I gave them my precious D630, with an extra 200mhz boost for checking Hotmail. At that point I had been tired of lugging the laptop back and forth to the studio and trying all these editing tricks without luck anyway so I went without.

Fast forward 6 months and I moved out of my apartment and don't have space for my desktop PC in the current location. Like my grandparents having gone without my own computer for several weeks and being tolerant but anxious, I decided to look for a laptop. It would become my primary computer that I could use at home and at the studio etc. So much for being tired of lugging stuff around-more like being tired of nothing!

The search for the perfect laptop went on for weeks. Eventually I arrived at the conclusion that there are many models out right now which share the same "frames" so to speak and have very little performance gains over each other but have significantly varying price points. I won't go into much detail but you could spend $1,900 for an Alienware with a i7-4800MQ or $1,100 for an HP Envy (like mine) for around $1,100. You can't just compare CPU models and brag about the price difference though, there are a few other things like the option (on only a select few manufacturers) for the top tier mobile video cards. Mine came with a NVIDIA 740M while I believe the top at the moment is a GTX780M (single.) Other options like SSD drives have a very significant change on performance. I'm not here to compare brands and say one is better than the other. I did a lot of research in one case I was turned off by one manufacturer because a user on YT said the laptop had great performance but the had the worst screen with terrible backlight bleed. Sorry- I'm out! My point in the rambling is that if you're even slightly technically minded and are looking for something, please do your homework. Spread it out over multiple days to soak things in, take notes, look at YT and forum posts on individual components like an upgraded CPU option etc. And don't forget to look for discount codes. I saved over $180 by waiting a week and looking for new codes. I had started to build the laptop out with one code, got distracted, came back a few days later an found a new code that was just posted for a larger discount!

And now onto the review...

...which I haven't written yet. However-I will say that the 17" 1080p display on the Envy 17t needs some tweaking with the Intel display color options. The reds are lacking and off balance. The viewing angles are just OK and colors don't have much pop. Fortunately with some tweaking we can trick our eyes into seeing the screen as if it had been sourced with better components.

My best results were as follows :
All colors option Brightness -4, contrast 50, gamma 0.9.
Red channel same as above.
Advanced : saturation 3
Play with the settings for your personal taste.

Monday, July 1, 2013

Capture Image Dell Precision T1650 WDS

As part of our continuing upgrade process to T1650s with Windows 7, I needed to create a WDS Capture Image. This allows a computer that has been sysprepped to be uploaded to a WDS server for rapid deployment. 


The problem here is that the WDS Capture Image (6.0.6002) we had been using for XP, Vista and Server 2008 (I think) does not appear to work with Windows 7 (6.1.7600). Also to mention the SATA/RAID/NIC drivers for the T1650 for WinPE are not easy to locate on Dell's website as they are not in the usual driver download list. 


I didn't take the time to step through each scenario and try to test whether or not I could get the 6.0.6002 capture image to grab a sysprepped Win7 installation, all I know is that it did not work the first time I tried, so I went forward with using a 6.1.7601 capture image with the correct SATA/RAID/NIC drivers. 

First, the drivers need to be located. Normally on the Dell Support site, by entering the service tag you get a list of drivers for that system by category. In that list is the SATA/RAID section. In this case, the drivers are bundled in a .CAB file under the "WinPE 3.0 Driver Cab Pack" You need these so WinPE can read the hard drive when the controller is in RAID mode (which it is by default on the T1650, although not configured in a RAID array unless done by the factory.) This file set includes a driver pack readme which details the folder structure and the associated drivers. The Serial ATA 54R22_A00-00 and Intel 825xx NIC 615P2_A00-00 drivers were needed in our configuration so I extracted the folders from the .CAB file and added them to the WDS Console's drivers section and gave them a grouping.


Next, I needed to create the capture WIM from the Windows 7 boot.wim (Win 7 media folder - sources\boot.wim) using the WDS Console. Right click in the boot section and select Add Boot Image. Choose boot.wim and add the description to "Source WIM" or something. When it's finished being added, right click on it and choose Create Capture Image. Name this Win7 Capture Image" or something appropriate. When that's done, right click on it again and choose Add Driver Package to Image. Click Search, then select the RAID/NIC drivers and finish the Wizard. Now, when you PXE (or USB) boot you can select your Win7 Capture image and hopefully read the sysprepped disk.  


Friday, January 18, 2013

Dell Precision T1650 and Microsoft MDT WDS LTI ZTI

At work we use Microsoft MDT 2010 to install Windows over the network instead of using CD/DVDs. MDT is a collection of tools like LiteTouch (LTI) and Windows Deployment Services (WDS) to deploy preconfigured installations of Windows to different hardware. 

We recently started to plan for desktop PC upgrades using Dell Precision T1650s. During the ordering process for hardware configuration there are two choices for NIC cards. One is integrated and the other is PCIe. We opted for the integrated which is an Intel 82579LM (DEV_1502).

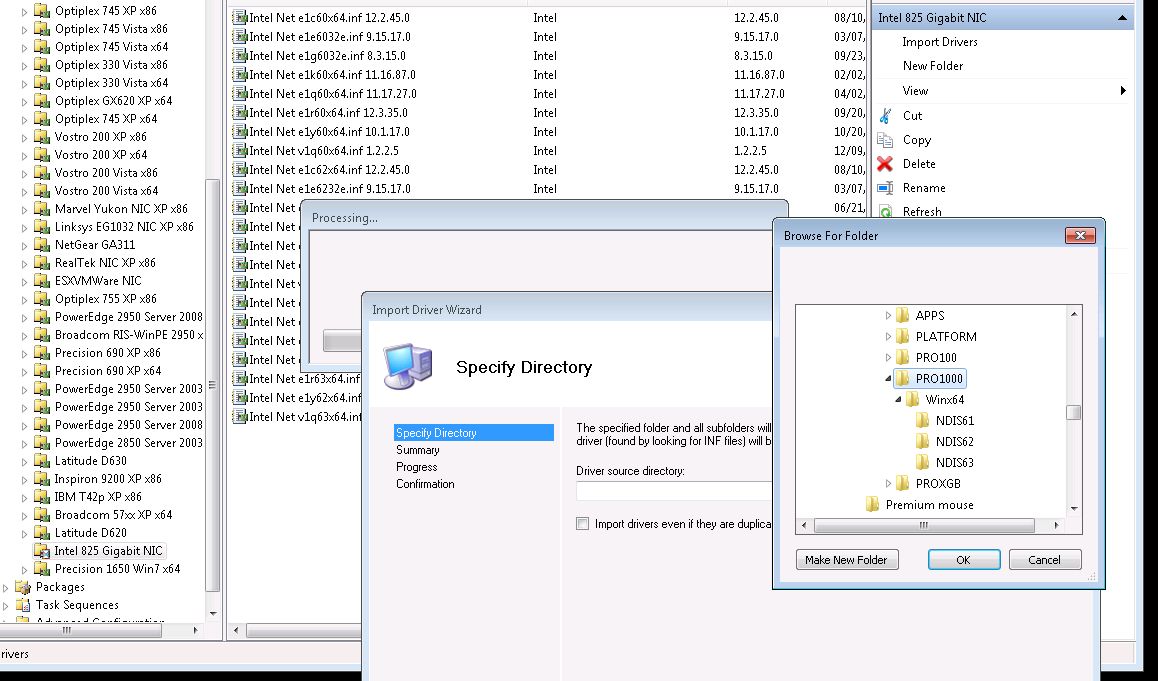
As part of the LTI installation sequence, a NIC driver is needed to communicate with the server that distributes the files to install Windows. Unfortunately none of our prior Intel drivers worked with this device so I need to add them to the LTI boot image for WDS. The next logical step would be to go to Dell's support site and get the drivers. The odd thing is that what's listed in the driver category is an Intel Diagnostic Utility which contains some unknown .INF files that aren't NIC drivers. Thinking that these were the right ones at the time I added them to LTI and couldn't connect to the network shares. 

It turns out that I needed to go to Intel directly and get their generic 825xx PRO1000 driver. Once I removed Dell's diagnostic "drivers" and added these it worked. The tricky part was without diving into looking for the command line options for the self extracting executable (PROWinx64.exe) was that by default it extracts to your user profile's temp directory as so: %userprofile%\AppData\Local\Temp\RarSFX0. Once these are extracted, you can add them to the MDT distributuion driver share using the "PRO1000" folder.

http://downloadcenter.intel.com/Detail_Desc.aspx?agr=Y&ProdId=3299&DwnldID=18713&ProductFamily=Ethernet+Components&ProductLine=Ethernet+Controllers&ProductProduct=Intel%c2%ae+82579+Gigabit+Ethernet+Controller&lang=eng

In summary, anyone having trouble with Dell Precision T1650 and WDS or LTI (or even ZTI, possibly even Ghost?) use the Intel generic drivers.